[expand title=”Want to practice using your compass on a hiking route?“]
[/expand]
If you’ve ever wondered how to use a compass, this is the right blog for you. We previously wrote a post about how to read a map and this is a perfect follow-on to that.
If you’re worried about getting lost on your hikes, even basic knowledge of the workings of a compass can put you in a much stronger position of finding your way again.
Parts of a Compass
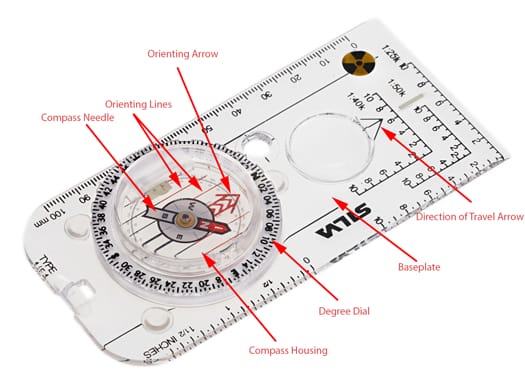
Baseplate
The baseplate of the compass is the flat bottom which allows you to place it steadily on your map.
There are scales, rulers and various other measurements on the baseplate to aid you with your compass navigation.
Direction of Travel Arrow
The direction of travel arrow is used when setting your compass from the map.
If you’re pointing your compass from one point on a map to another in order to find the direction, you’re direction of travel arrow should always be going from the point you’re at to the point you’re going to.
Compass Housing
The compass housing protects the compass needle and surrounding fluid from the world, allowing the needle to turn freely and point north.
You turn the compass housing in order to align your compass to find your direction.
Around the outside of the compass housing is the degree dial.
Degree Dial
The degree dial is located around the outside of the compass housing. You hold and turn this in order to turn the whole compass housing.
Magnetic Needle
The magnetic needle is what swivels and points north. True north and magnetic north are two different things.
A compass needle points to magnetic north, following the earth’s magnetic field which is constantly changing.
True north is determined by the earth’s axis, with north ending at the north pole (where all the lines on a globe, for example, meet at the top).
Orienting Arrow
This rotates with the compass housing and is used in order to orient the compass with the map.
Orienting Lines
Orienting lines are marked on the bottom of the compass housing and are used to line up the compass with the map.
How to use a Compass
The Compass Needle
An important part of learning how to use a compass is how the compass needle related to the rest of the compass.
On all mountaineering compasses the magnetic needle will be two different colours.
Usually this is red and white, with the red part always pointing north. Sometimes black replaces the red colour.
To orient yourself north, stand with your compass held tight against your chest with the direction of travel arrow point outwards.
The red part of the magnetic needle will be pointing north. Make sure your orienting arrow is aligned with North on your degree dial.
Slowly turn your body until the magnetic needle is lined up with the orienting arrow. You are now facing north.
Take a Compass Bearing
While learning how to use a compass, it’s useful to know how to take a compass bearing.
To take a compass bearing, we use the small numbers on the degree dial.
Imagine you can see the spot height of a mountain close to you.
To find the bearing from your position to it, point your direction of travel arrow towards it.
Slowly rotate your compass housing until the orienting arrow is lined up with the magnetic needle – red on red (or in some cases, black on red!).
Your compass bearing is the number that is now in line with your direction of travel arrow.
Taking a Bearing from your Map
In order to know how to use a compass to navigate, you need to take a compass bearing from your map.
To point the compass in the direction that you want to travel, you need to have two points on a map. The first point is where you are, and the second is where you want to go.
Take up a sturdy position, such as kneeling with one knee on the ground. This will provide a surface (your leg) to rest your map on while also getting out of the wind.
Place the baseplate of the compass firmly on your map, creating a straight line between the two aforementioned points. Make sure the direction of travel arrow is pointing to where you want to go.
Next, turn your compass housing until the orienting lines (on the bottom of your housing) are lined up with the grid lines on your map.
Turn your body until you get red on red – magnetic needle is lined up with your orienting arrow.
Keep realigning every 100-200m to make sure you don’t go off course.
Declination
The declination degree is the difference between magnetic north and true north. This is also constantly changing due to the fact the the earth’s magnetic field is constantly changing.
Each map will display the declination value (relative to how old the map is) – this can be a westerly declination (-) or an easterly declination (+).
To adjust for destination, simply add or subtract your given declination degree from our bearing and this will put you on the right track.
We hope that you found this guide helpful and for more information on our range of self-guiding hiking tours, just click here.
[expand title=”Want to practice using your compass on a hiking route?“]
[/expand]
